Project: Biology Honors
The plan for me an Mitchell's project is to make a 3D printed, motor controlled hand that is based on the one from the InMoov open source project robot project. By doing this we will learn how to use 3D printers, to program, and basic knowledge on construction and wiring.
The project consists of a 3D printed custom set of joints, wrist pieces, and forearm pieces. Strong fishing line is wired through the fingers and connected to servo motors, small motors that have a lot of torque and spin to pull on the fishing line, contracting the fingers, similar to a tendon. These servos (There should be 6 of them) are wired up to an arduino and can be programmed to clasp and release.
The joints of the fingers are achieved by inserting a small filament through the holes of the two separate pieces. This creates a flexible joint but still keeps them attached.

A picture of another model of the hand. Ours will look similar but will not have the electrical wiring present in the fingers as we will not be utilizing fingertip sensors.
Materials:
Plastic filament: This is inserted into the 3D printer and feeds into the extruder as it prints.

Servo motors: These are placed into the forearm. A ring is attached to the spinning knob and the braided fishing line is tied to opposite sides. This is to give torque for expanding and contracting the fingers. There is one for each finger and one for the wrist.

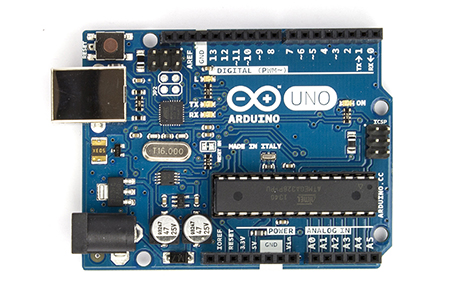
Arduino Uno: This is the brain of the arm! The servos are wired to the arduino, that is is turn wired to a computer, in order to program and control the hand.
200 pound rated braided fishing wire: This is extremely strong and resilient string that will act as the tendon to pull and contract the wrist and fingers.

September-Early October
We started the project as early as possible, however, progress through this time has been slow. We have ordered almost all the parts we need to construct it, including printer filament, fishing line, and servo motors. Throughout this time we have familiarized ourselves with the operation of 3D printers, including the different types of plastic, settings, software operation, and loading / unloading printer filament.
Due to a number of issues and not being able to get into Dr. Don's classroom enough, we haven't been able to make anything we can show yet. We have been working on the printers before school during Wednesdays, during x block, and sometimes during lunch and during / after school. Progress can be slow with the time wasted preheating the printers, restarting / troubleshooting the older computers, and dealing with crashes.
We also worked with a different, more expensive printer model. However, it took almost 10 minutes to turn an .stl file into the "g-code" that the printer could read and a similar time for it to heat up. If there was anything wrong with the speed or settings, it was a big waste of time and we would have to start over. Our biggest problem, however, was the printers tendency to smear plastic all over the extruder instead of going where we wanted it to go.

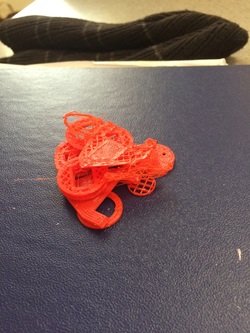
Above: The printer beginning to print the first finger
Below: The final result. We had to toss it because it printed out weak and flakey. After this print the 3D printers became jammed and broken and could not be used for a long time.
Below: The final result. We had to toss it because it printed out weak and flakey. After this print the 3D printers became jammed and broken and could not be used for a long time.

Problems
-Software would crash repeatedly when attempting to print.
Solution: Switched software and laptops ; general troubleshooting
-Printer would not extrude.
Solution: The extruder head is susceptible to jamming, and needs to be opened completely in order to fix. Or it might not be hot/cold enough.
-Printer extruder would attempt to print in mid air
Solution: On both sides of the raised platform there are hinges that must periodically be adjusted or the motor will not work.
-Printer would drag the product we are printing
Solution: A proper amount of glue needs to be added to the bed
-Laptop could not connect to the printer
Solution: Reinstalling drivers and some luck
Pictured Below: Bowl of failed prints.

Makers Place: October |
|
Edit: Not long before this post, the servo motors arrived. We have almost everything we need to actually start building, except for the actual parts the 3D printer needs to print and a small collection of easily accessible nuts and bolts.
Because I am interning at makersplace, they have allowed me to come into their site early in order to utilize their 3D printers. When we went there we toured the premises before Mitchell arrived and we were allowed to use the 3D printers.
We also learned of an acetone contraption present the building that is built in order to glue things together with acetone as well as smooth out jagged plastic. Perfect for our 3D printed materials!
We went to makers place for around an hour and a half, troubleshooting the two printers. We faced very similar issues to what we faced with Dr. Dons printers, up to and including the program crashing several times. The motor bed used to raise and drop the extruder was broken, and would detach seemingly randomly and spin. Other wires also appeared suspiciously out of place. We learned that the printers had just broke and had to go out of service until a technician could fix them.
Makers Place Continued
We decided to temporarily on makers place after calling for the third time to hear the printers were broken, with no set date on when they were fixed. Dr. Don's printers were still giving us issues. We plan on trying again during Thanksgiving break.
November: Success! Sort of...
We decided to return to Dr. Don, despite all the issues we have had before. One of the printers was still broken, but to our surprise the other started working again! We finally printed something! Currently 3 out of the 5 fingers have been printed (It would be 4 but some unknown assailant destroyed one of our prints after it finished), and we still need to print the much larger wrist and forearm pieces. We may just try and assemble the hand with the limited time we have left.
Edit1: Got the 4th finger
Edit2: Attempted to print the thumb twice, both to come back to catastrophic failure. Despite gluing the surface I believe the printer somehow moved the pieces, causing it to essentially spew out a plastic mess.
Edit1: Got the 4th finger
Edit2: Attempted to print the thumb twice, both to come back to catastrophic failure. Despite gluing the surface I believe the printer somehow moved the pieces, causing it to essentially spew out a plastic mess.


ABOVE: Partially assembled fingers. The separated piece behind connects to the wrist and is glued to the bottoms of the fingers.
BELOW: Picture of what the thumb turned out as.
BELOW: Picture of what the thumb turned out as.
Thanksgiving Break
Printers at makers place are STILL broken and out for service. Without Dr. Don's printer we are running out of options. We tried going to the Public Library in order to utilize their 3D Printers, however, their 2 hour limit meant we couldn't actually complete any one print.
We can't even begin to assemble it until we have the wrist for the fingers to attach to printed out.
We can't even begin to assemble it until we have the wrist for the fingers to attach to printed out.
December

Above: Utilizing the printers at Makerplace on december 3rd. They had (finally) gotten fixed and we were the first ones to use them. The print above actually succeeded. We were unable to print anything else as they quickly got reserved by members.
Below: Picture of the modded robo-3d printer's control panel. Files are sliced and loaded into an sd card instead of printing directly from the computer.
Below: Picture of the modded robo-3d printer's control panel. Files are sliced and loaded into an sd card instead of printing directly from the computer.


Above: Attempting to use the 3D printer at our school to print the rest of the wrist. Product came out melted in on itself and bent.
Below: The four fingers partially assembled. The hinge pegs nor the fishing line has been implemented because we are lacking the rest of the parts.
Below: The four fingers partially assembled. The hinge pegs nor the fishing line has been implemented because we are lacking the rest of the parts.

Conclusion
Due to technical issues we haven't gotten nearly as far as we wanted to! We did not get to even touch the wiring and programming of the arduinos in the time we had. We will, however, continue to work on it and it will be finished. However, we still learned a lot about the use of 3D printers.
